Copy a Finance and Operations database from Azure SQL Database to a SQL Server environment


This topic provides information about how to export a Microsoft Dynamics 365 for Finance and Operations database from an Azure-based environment, and then import it to a SQL Server-based environment.
Overview
Moving a database involves using the sqlpackage.exe command line tool to export a database from Azure SQL Database and then import the database to Microsoft SQL Server 2016. Because the file extension for the exported data is .bacpac, the process for moving a database is commonly referred to as the bacpac process. The high-level process for a database move is:
- Create a duplicate of the source database.
- Run a SQL Server script to prepare the database.
- Export the database from the Azure SQL database.
- Import the database to SQL Server 2016.
- Run a SQL script to update the database.
Prerequisites
The following prerequisites are required before you can move a database.
- Only a database to which the customer has SQL access to can be copied. If you must copy the production environment, then first copy the production environment to the sandbox environment, and work from the sandbox environment.
- The destination SQL Server environment must be running SQL Server 2016 RTM (13.00.1601.5) or higher. The CTP versions of SQL Server 2016 may cause errors during the import process.
- To export a database from a sandbox environment, you must install the latest SQL Server Management Studio to the AOS machine in that environment and perform the bacpac export on that AOS machine. This is for two reasons. First, there is an IP access restriction on the sandbox SQL Server instance, which only allows a connection from a machine within that environment. Second, the version of SQL Server Management Studio installed by default is for a previous version of SQL Server and can't complete the tasks required.
Before you begin
Encrypted and environment-specific values can't be imported into a new environment. After you've completed the import, you must re-enter some data from your source environment in your target environment.
Document the values of encrypted fields
Because of a technical limitation that is related to the certificate that is used for data encryption, values that are stored in encrypted fields in a database will be unreadable after that database is imported into a new environment. Therefore, after an import, you must manually delete and re-enter values that are stored in encrypted fields. New values that are entered in encrypted fields after an import will be readable. The following fields are affected. (The field names are given in Table.Field format.)
| Table.field name | Where to set the value |
| CreditCardAccountSetup.SecureMerchantProperties | Click Accounts receivable > Payments setup > Payment services. |
| ExchangeRateProviderConfigurationDetails.Value | Click General ledger > Currencies > Configure exchange rate providers. |
| FiscalEstablishment_BR.ConsumerEFDocCsc | Click Organization administration > Fiscal establishments > Fiscal establishments. |
| FiscalEstablishmentStaging.CSC | This field is used by the Data Import/Export Framework. |
| HcmPersonIdentificationNumber.PersonIdentificationNumber | Click Human resources > Workers > Workers. On the Worker tab, in the Personal information group, click Identification numbers. |
| HcmWorkerActionHire.PersonIdentificationNumber | This field has been obsolete since the February 2016 release. It was previously in the Human resources > Workers > Actions > All worker actions form. |
| SysEmailSMPTPassword.Password | Click System administration > Email > Email parameters. |
| SysOAuthUserTokens.EncryptedAccessToken | This field is used internally by the AOS. It can be ignored. |
| SysOAuthUserTokens.EncryptedRefreshToken | This field is used internally by the AOS. It can be ignored. |
If you're running Retail components, document encrypted and environment-specific values
The values in the following forms are either environment-specific or encrypted in the database. Therefore, all the imported values will be incorrect.
- Accounts receivable > Payments setup > Payments services
- Retail and commerce > Channel setup > POS setup > POS profiles > Hardware profiles
Copy the source database
Because you will need to disable change tracking and delete the users from the database before you can export, you should create a copy of the source Azure SQL database that you will export. Then, you can work with a copy instead of deleting information from the original database. The following SQL statement will create a copy of the database axdb_mySourceDatabaseToCopycalled MyNewCopy. Edit this script with your own database names.
CREATE DATABASE MyNewCopy AS COPY OF axdb_mySourceDatabaseToCopy
Note that this command will execute asynchronously, meaning that it will appear to complete after 1 minute, but actually it is running in the background. For more information, refer to CREATE DATABASE (Azure SQL Database). To monitor the progress of the copy operation, execute the following query against the MASTER database within the same instance.
SELECT * FROM sys.dm_database_copies
Prepare the copied database
Run the following script against the copied database to remove change tracking, SQL Database users, and a system view. The script will also correct system flags, remove references to the previous environment, withhold batches, and remove email configuration. These changes are all required to successfully export and import the database and to ensure that when the AOS is started in the target environment, nothing will automatically start running.1
Note
You must update the following ALTER DATABASE command with your database copy name.
--Prepare a database in SQL Azure for export to SQL Server.
--Disable change tracking on tables where it is enabled.
declare
@SQL varchar(1000)
set quoted_identifier off
declare changeTrackingCursor CURSOR for
select 'ALTER TABLE ' + t.name + ' DISABLE CHANGE_TRACKING'
from sys.change_tracking_tables c, sys.tables t
where t.object_id = c.object_id
OPEN changeTrackingCursor
FETCH changeTrackingCursor into @SQL
WHILE @@Fetch_Status = 0
BEGIN
exec(@SQL)
FETCH changeTrackingCursor into @SQL
END
CLOSE changeTrackingCursor
DEALLOCATE changeTrackingCursor

--Disable change tracking on the database itself.
ALTER DATABASE
-- SET THE NAME OF YOUR DATABASE BELOW
MyNewCopy
set CHANGE_TRACKING = OFF
--Remove the database level users from the database
--these will be recreated after importing in SQL Server.
declare
@userSQL varchar(1000)
set quoted_identifier off
declare userCursor CURSOR for
select 'DROP USER ' + name
from sys.sysusers
where issqlrole = 0 and hasdbaccess = 1 and name <> 'dbo'
OPEN userCursor
FETCH userCursor into @userSQL
WHILE @@Fetch_Status = 0
BEGIN
exec(@userSQL)
FETCH userCursor into @userSQL
END
CLOSE userCursor
DEALLOCATE userCursor
--Delete the SYSSQLRESOURCESTATSVIEW view as it has an Azure-specific definition in it.
--We will run db synch later to recreate the correct view for SQL Server.
if(1=(select 1 from sys.views where name = 'SYSSQLRESOURCESTATSVIEW'))
DROP VIEW SYSSQLRESOURCESTATSVIEW
--Next, set system parameters ready for being a SQL Server Database.
update sysglobalconfiguration
set value = 'SQLSERVER'
where name = 'BACKENDDB'
update sysglobalconfiguration
set value = 0
where name = 'TEMPTABLEINAXDB'
--Clean up the batch server configuration, server sessions, and printers from the previous environment.
TRUNCATE TABLE SYSSERVERCONFIG
TRUNCATE TABLE SYSSERVERSESSIONS
TRUNCATE TABLE SYSCORPNETPRINTERS
--Remove records which could lead to accidentally sending an email externally.
UPDATE SysEmailParameters
SET SMTPRELAYSERVERNAME = ''
GO
UPDATE LogisticsElectronicAddress
SET LOCATOR = ''
WHERE Locator LIKE '%@%'
GO
TRUNCATE TABLE PrintMgmtSettings
TRUNCATE TABLE PrintMgmtDocInstance
--Set any waiting, executing, ready, or canceling batches to withhold.
UPDATE BatchJob
SET STATUS = 0
WHERE STATUS IN (1,2,5,7)
GO
Export the database
Open a command prompt as an Administrator, and then execute the following commands.
cd C:\Program Files (x86)\Microsoft SQL Server\130\DAC\bin

SqlPackage.exe /a:export /ssn:<server>.database.windows.net /sdn:<database to export> /tf:D:\Exportedbacpac\my.bacpac /p:CommandTimeout=1200 /p:VerifyFullTextDocumentTypesSupported=false /sp:<sql password> /su:<sql user>
The following list provides an explanation of the parameters:
- ssn (source server name): The name of the SQL Azure server from which you will export.
- sdn (source database name): The name of the database that you will export.
- tf (target file): The path and file name that you will export to.
- sp (source password): The SQL password for source SQL Server.
- su (source user): The SQL user name for the source SQL Server. We recommend that you use the sqladmin user, which the deployment will have created on every Dynamics SQL instance. You can retrieve the password for this user from your Lifecycle Services (LCS) project.
After the export completes, delete the copied database.
DROP DATABASE [MyNewCopy]
Import the database
When you import the database, we recommend that you:
- Retain a copy of the existing AxDB database, to allow you to revert to it later if needed.
- Import the new database with a new name, for example AxDB_fromProd.
Copy the *.bacpac file to the local machine from which you will import to ensure the best performance. Open a command prompt as Administrator and run the following commands.
cd C:\Program Files (x86)\Microsoft SQL Server\130\DAC\bin

SqlPackage.exe /a:import /sf:D:\Exportedbacpac\my.bacpac /tsn:localhost /tdn:<target database name> /p:CommandTimeout=1200
The following list provides an explanation of the parameters:
- tsn (target server name): The name of the SQL Server that you will import to.
- tdn (target database name): The name of the database that you will import to. The database should not already exist.
- sf (source file): The path and file name to import from.
Note
During import, the user name and password are not required because SQL Server will default to Windows authentication for the currently logged on user.
Update the database
Execute the following SQL script against the imported database. This will add back the users that were deleted from the source database earlier, correctly linking them to the SQL logins for this SQL instance and also re-enable change tracking. Remember to edit the final ALTER DATABASE statement with your database name.
CREATE USER axdeployuser FROM LOGIN axdeployuser
EXEC sp_addrolemember 'db_owner', 'axdeployuser'

CREATE USER axdbadmin FROM LOGIN axdbadmin
EXEC sp_addrolemember 'db_owner', 'axdbadmin'

CREATE USER axmrruntimeuser FROM LOGIN axmrruntimeuser
EXEC sp_addrolemember 'db_datareader', 'axmrruntimeuser'
EXEC sp_addrolemember 'db_datawriter', 'axmrruntimeuser'

CREATE USER axretaildatasyncuser FROM LOGIN axretaildatasyncuser
EXEC sp_addrolemember 'DataSyncUsersRole', 'axretaildatasyncuser'

CREATE USER axretailruntimeuser FROM LOGIN axretailruntimeuser
EXEC sp_addrolemember 'UsersRole', 'axretailruntimeuser'
EXEC sp_addrolemember 'ReportUsersRole', 'axretailruntimeuser'

CREATE USER [NT AUTHORITY\NETWORK SERVICE] FROM LOGIN [NT AUTHORITY\NETWORK SERVICE]
EXEC sp_addrolemember 'db_owner', 'NT AUTHORITY\NETWORK SERVICE'

UPDATE T1
SET T1.storageproviderid = 0
       , T1.accessinformation = ''
       , T1.modifiedby = 'Admin'
       , T1.modifieddatetime = getdate()
FROM docuvalue T1
WHERE T1.storageproviderid = 1 --Azure storage

ALTER DATABASE [<your AX database name>] SET CHANGE_TRACKING = ON (CHANGE_RETENTION = 6 DAYS, AUTO_CLEANUP = ON)
Re-provision the target environment
When copying a database between environments, you will need to run the environment re-provisioning tool before the copied database is fully functional after being copied, to ensure that all Retail components are up-to-date.
Important
We recommend that you run this procedure whether you are using Retail components or not, because Retail functionality is included in all environments.
Before you continue, you must make sure that the following prerequisites are met: If your target enviornment is running the July 2017 release or later, you must first apply KB 4035399 in your target environment. KB 4035399 If your target environment is running the November release (version 1611), you must apply the following hotfixes in your target enviornment:
- KB 4025631
- KB 4035355
- KB 4035492
Before you continue, you must make sure that the following prerequisites are met:
- If your target enviornment is running the July 2017 release or later, you must first apply KB 4035399 in your target environment.
- If your target environment is running the November release (version 1611), you must apply apply the following hotfixes in your target environment:
- KB 4025631
- KB 4035355
- KB 4035492
- KB 4010947
- The default channel database and the default channel data group must be named Default. If you've renamed them, you must change the names back.
Follow these steps to run the Environment reprovisioning tool.
- In the Shared asset library, select Software deployable package.
- Download the Environment reprovisioning tool.
- In the asset library for your project, select Software deployable package.
- Select New to create a new package.
- Enter a name and description for the package. You can use Environment reprovisioning tool as the package name.
- Upload the package that you downloaded earlier.
- On the Environment details page for your target environment, select Maintain > Apply updates.
- Select the Environment reprovisioning tool that you uploaded earlier, and then select Applyto apply the package.
- Monitor the progress of the package deployment.
For more information about how to apply a deployable package, see Apply a deployable package. For more information about how to manually apply a deployable package, see Install a deployable package.
Reset the Financial Reporting database
If you're using Financial Reporting (formerly Management Reporter), then follow the steps to reset the financial reporting database in Resetting the financial reporting data mart after restoring a database.
Start using the new database
To switch the environment and use the new database, stop the services in the following list, rename the AxDB database to AxDB_orig, and then rename your newly imported database AxDB. Restart the services in the following list:
- World wide web publishing service
- Finance and Operations Batch Management service
- Management Reporter 2012 Process service
To switch back to the original database, reverse the step above. Stop the services, rename the databases, and then start the services.
Reenter data from encrypted and environment specific fields in the target database
In the Finance and Operations client, enter the values that you documented for the encrypted and environment-specific fields. The following fields are affected. (The field names are given in Table.Field format.)
| Table.field name | Where to set the value |
| CreditCardAccountSetup.SecureMerchantProperties | Click Accounts receivable > Payments setup > Payment services. |
| ExchangeRateProviderConfigurationDetails.Value | Click General ledger > Currencies > Configure exchange rate providers. |
| FiscalEstablishment_BR.ConsumerEFDocCsc | Click Organization administration > Fiscal establishments > Fiscal establishments. |
| FiscalEstablishmentStaging.CSC | This field is used by the Data Import/Export Framework. |
| HcmPersonIdentificationNumber.PersonIdentificationNumber | Click Human resources > Workers > Workers. On the Worker tab, in the Personal information group, click Identification numbers. |
| HcmWorkerActionHire.PersonIdentificationNumber | This field has been obsolete since the February 2016 release. It was previously in the Human resources > Workers > Actions > All worker actions form. |
| SysEmailSMPTPassword.Password | Click System administration > Email > Email parameters. |
| SysOAuthUserTokens.EncryptedAccessToken | This field is used internally by the AOS. It can be ignored. |
| SysOAuthUserTokens.EncryptedRefreshToken | This field is used internally by the AOS. It can be ignored. |
Known issues
Cannot drop users in source database
When dropping users in the source database, the user axdbadmin or axdeployuser may fail to delete as they are currently owner of the full-text catalog. This occurs if the database was originally created in CTP7 or CTP8. To resolve this, change the owner to the dbo user using the transact-SQL command ALTER AUTHORIZATION.
ALTER AUTHORIZATION ON Fulltext Catalog:: TO [dbo];
Can't download SQL Server Management Studio installation files
When you attempt to download the SQL Management Studio install, you might receive the following error:
"Your current security settings do not allow this file to be downloaded."
To work around this issue, enable file download for the Internet Zone, on the Security tab in Internet Options, as shown below.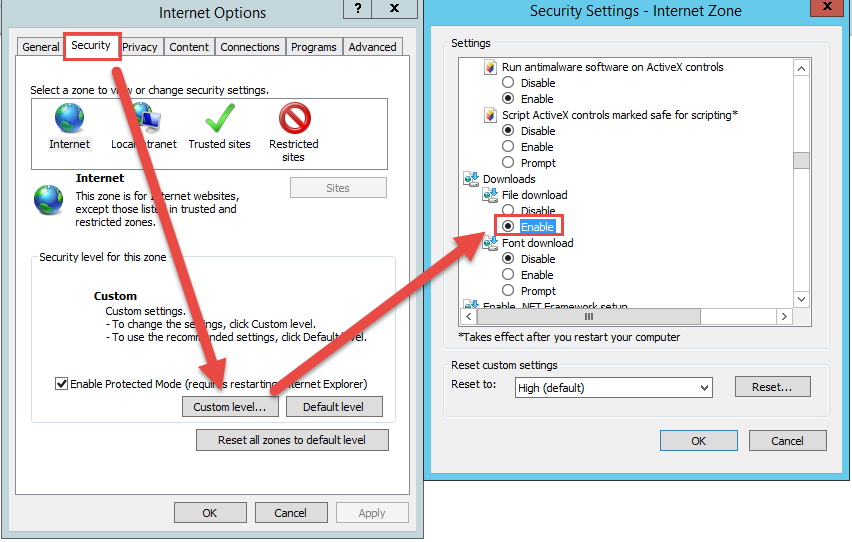
Database synchronization fails
When you synchronize the database against the newly imported database from Visual Studio, the synchronization might fail with the following error:
"Failed to open SQL connection syncengine.exe exited with code -1."
Also, in the Windows application log, you will find this message logged under event ID 140:
Object Server Database Synchronizer: The internal system table version number stored in the database is higher than the version supported by the kernel (141/138). Use a newer Microsoft Dynamics kernel, or start Microsoft Dynamics using the -REPAIR command line parameter to enforce synchronization.
This can occur when the platform build number of the current environment is lower than the platform build number of the source environment. Depending on your circumstances, either upgrade the current environment’s platform to match the source environment, by using the Updates tiles on the LCS Environment page, or adjust the expected version in the database by using the following query.
UPDATE SQLSYSTEMVARIABLES

SET VALUE = 138

WHERE PARM = 'SYSTABVERSION'
Note
The value 138 in the query above is taken from the event log message that was expecting 138 in this particular environment.
Performance
Refer to the following guidelines for optimal performance:
- Always export a database from a virtual machine that is located in the same Azure data center as the Azure SQL database. If you are exporting a copy of your sandbox database, export it from the Sandbox AOS machine.
- Always import the .bacpac locally on the machine that is running the SQL Server instance. Do not import from SQL Server Management Studio on a remote machine.
- On a Dynamics 365 for Finance and Operations one-box environment, also known as a tier 1 environment, which is hosted in Azure, place the bacpac file on the D: drive when importing for increased performance. Read more about the temporary drive in Azure machines in the blog post Understanding the temporary drive on Windows Azure Virtual Machines.
- Grant the account running the SQL Server Windows service the Instance File Initializationrights. This can speed up the import process and improve the speed of restore from a *.bak file. A simple way to do this in a Developer environment is to set SQL Server to run as the axlocaladmin account.
- From SQL Azure, do not select Export data tier application in SQL Server Management Studio because there can be a memory limitation for larger databases.


Comments
Post a Comment